Before you start…….YES you can, because if I can make this so can YOU !!!!!
Right we’ve got that out the way, now for the back story 🙊 I will make it brief, I know you all hate loads of diatribe I’ve been informed by a reliable source 😂😂
I started my baking journey, adapting recipes to fit dietary needs. Some of my inspiration is mentioned on hatches and dispatches on the blog , but mostly now my knowledge base is enough to start from scratch.
But that’s not always the case, and this is the case with this cake.
This is a Cake from the Cake Mistress herself Tessa Huff.
An egg-less chocolate cake that can be found in her ‘Layered ‘ Cake Book as a Chocolate and Coconut Cake or at the blog / website http://www.stylesweet.com as a Rainbow Cake
Well if I’m going to give you an adapted GF / V I’m going to use only the best……and being British I did ask nicely….because ‘ mutilating’ someones recipe isn’t always what they intended their recipe to be used for 🙊😜
This cake is also minus the coconut in any element, as a dairy free diet can be heavy in nut taste and coconut and to be fair the world isn’t necessarily like that……its just my thing.
I’m currently blaming both Molly and Cindy for my new passion and inspiration, and my desire make adapt an accomplished bakers recipes behind closed doors…..some of which you can see on Instagram………….(Link is at the bottom of the page or the side bar )
So back to the cake……….. there are a few elements but lets be honest, its me I am hardly going to give you a standard cake on this occasion……..if I was personally going to do it I wanted to do it my style and my ‘bits’ 🙈
So The Recipe is fairly extensive, but you don’t have to do it all. There will be a couple of stand alone posts in the next few weeks for the Cheats Vegan Caramel Frosting and the Caramel / Toffee ( I’ve not got a clue what on earth the difference is when its vegan 😜 take your pick ).
Mainly because they they can be used over the Autumnal Season and Winter so you will then have them at hand…….but today you get them in brief………ish 🙈
I can honestly say this is the lightest chocolate cake I’ve ever produced , if you want fudge cake this is not the recipe for you. this is a beautiful moist sponge that just keeps giving ( day 5 today and I’ve just had a test slice and its still as moist as the day I made it )😍
So grab a coffee, sit back and relax and just remember , before you start reading this is A TWO DAY CAKE ……….. but start today it will be ready for Sunday lunch , give them that wow factor

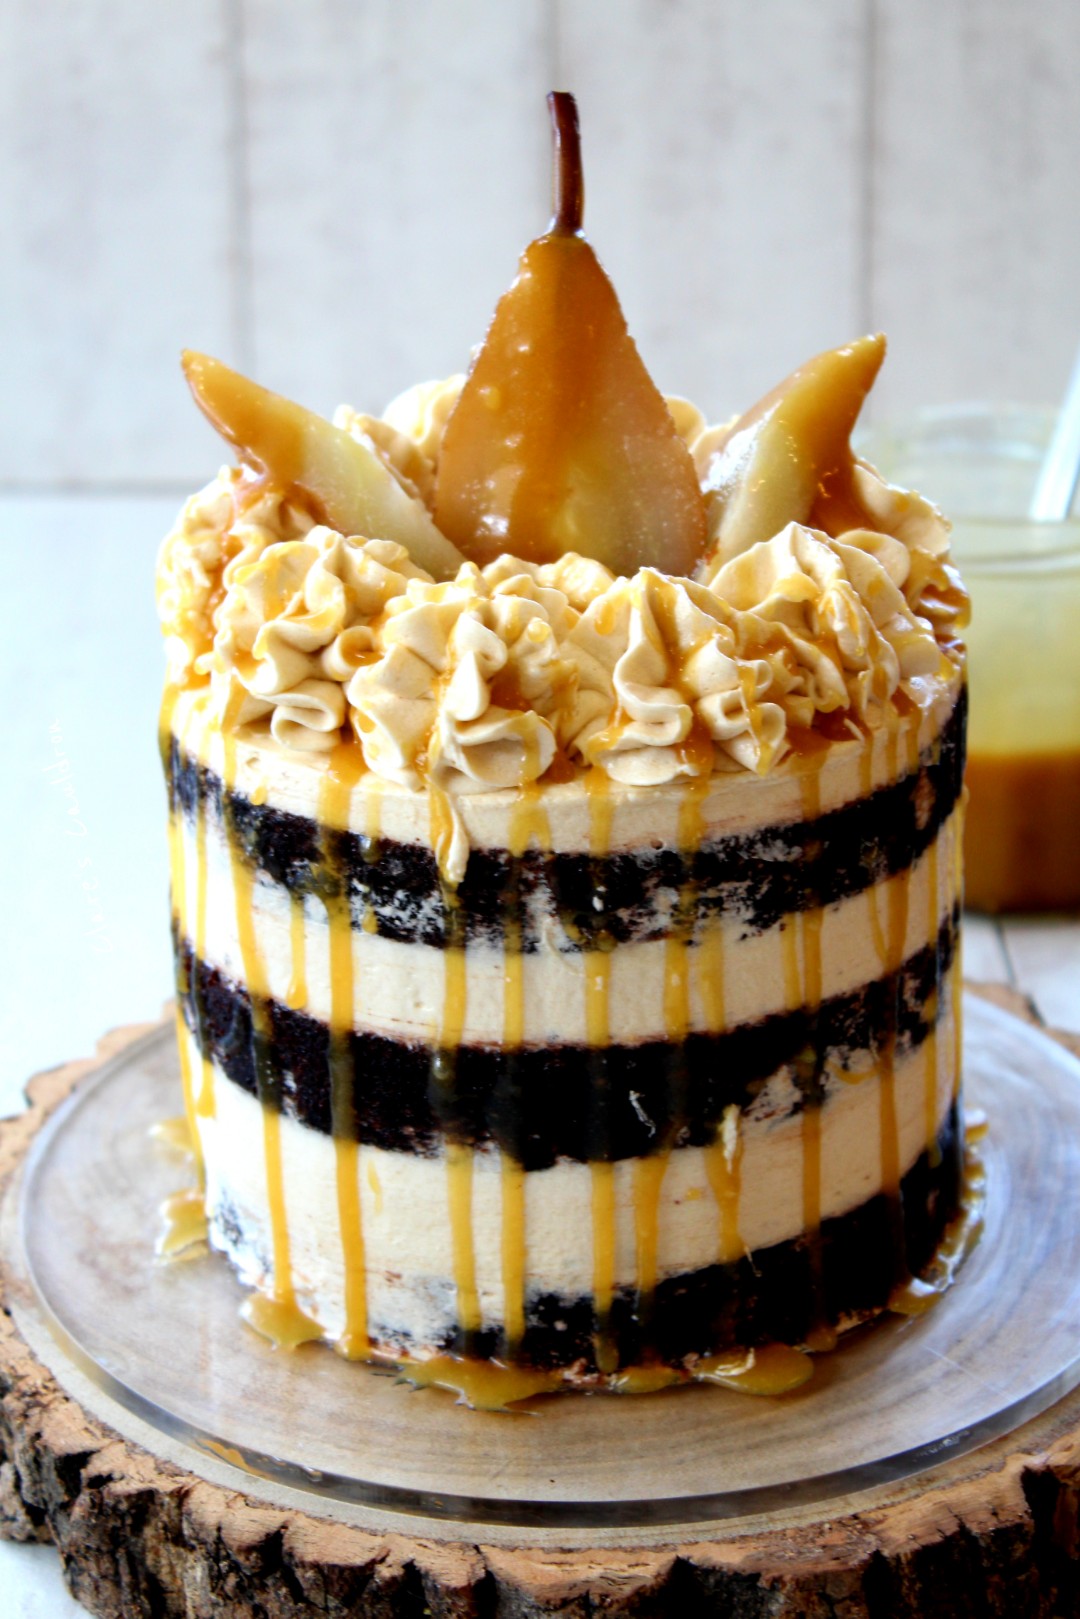
The 'Layered ' Chocolate Cake 'GF, DF V
An Decadent Chocolate Cake, Filled with Caramel Frosting, Chai Spiced Pears and Drizzled with Oddles of Caramel , Toffee Sauce
Ingredients
- THE CAKE
- 250 g Gluten Free Plain Flour Blend ( Dove Farms UK or Pilsbury US is my recommendations if you dont make your own blend )
- 1/4 tsp Xanthan Gum ( omit if your blend has it )
- 250 g Caster or superfine Sugar
- 35 g Cocoa Powder , unsweetened
- 1 1/2 tsp baking soda
- 1/2 tsp Ground Cinnamon
- 1/4 tsp of Salt
- 120 ml Vegetable Oil
- 1 1/2 tbsp Apple Cider Vinegar
- 1 tsp Vanilla Extract
- 4 tsp espresso instant coffee powder
- 360 ml boiled water
- 220g Soft Brown Sugar
- 70 g Gluten Free Flour
- 400 ml Rice Milk
- 200 g Vegan Butter ( Stork Block UK or Earth Balance US )
- 160 g Trex ( uk ) or Hi ratio or Cristo Shortening (US )
- 1 tsp Vanilla Extract
- 100 g Golden Syrup
- 200 g Soft Brown Sugar
- 150 g vegan butter ( Stork Block UK or Earth balance US )
- 100 g Soy Cream ( i used Alpro )
- 1 tsp Vanilla Essence
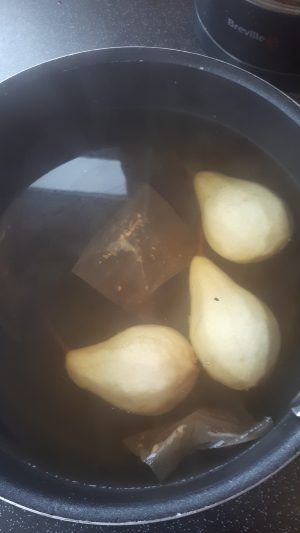
- 3 Pears of choice…. small to medium size
- 30 g Granulated Sugar
- 3 Chai Teabag ( I used Twinnings Spiced Chai )
- 1500 ml Boiled Water
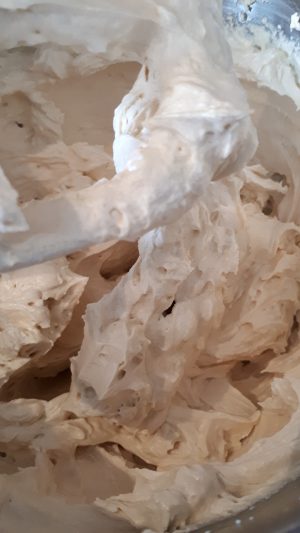
THE CARAMEL ERMINE FROSTING
THE CARAMEL SAUCE
THE CHAI PEARS
Directions
- Pre heat your oven to 165 C fan / 175 C conventional / 35O f
- Fully grease and line 3 6 in baking pans
- Make up the boiled water and espresso powder and leave to one side
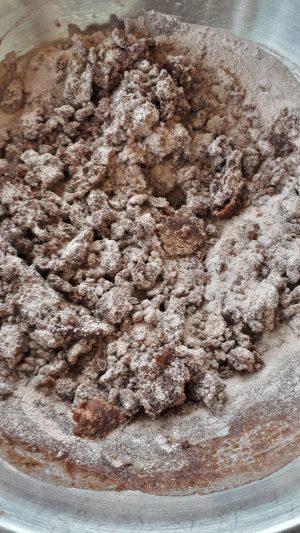
- In a large bowl add the Gluten free Flour, Xanthan Gum ( if using )sugar, cocoa powder, baking soda , cinnamon and salt, mix with a metal whisk
- Sieve the these ingredients into another bowl…..yes more washing up 🙈 there really is no short cut it needs both steps to be done for a great rise
- Add the vinegar to the oil and the vanilla extract and give it a stir
- Add the oil mixture to the dry ingredients and combine….it may look dodgy
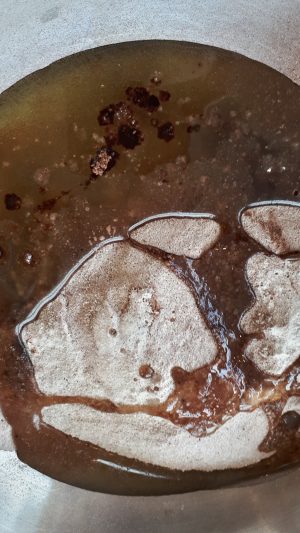
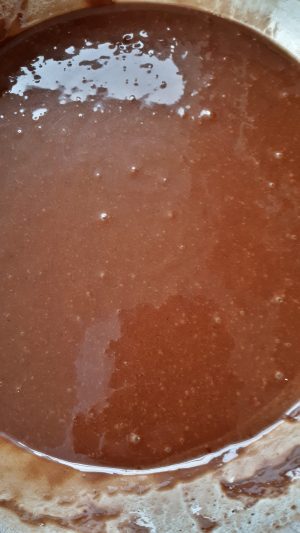
- then add the coffee liquid to the thick mixture in three equal qualities, combining each time with a spatula until its thick and mostly smooth
- You should see bubbles appearing, its now starting its magic lifting
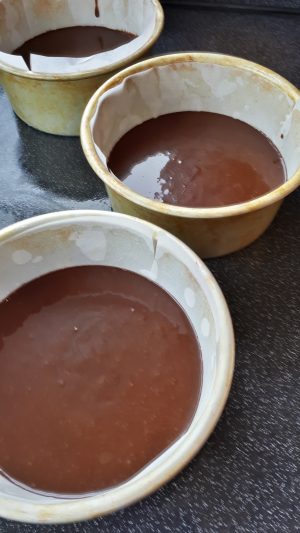
- Evenly divide into 3 tins, I’m lucky my tins weigh the same so I just place them on the scale and eyeball most of it in until the last 25 g and then even it up
- Give the tins a little shake to make it even
- Put in the oven on the middle rack for 25 minutes and bake until risen, a cocktail stick or cake tester comes out cleanly in the middle
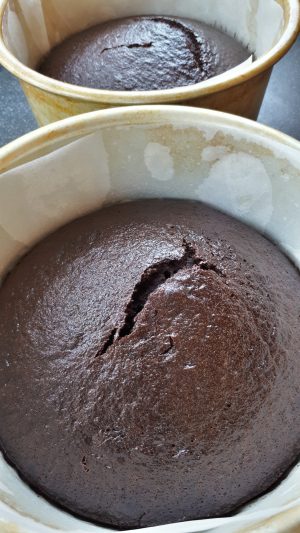
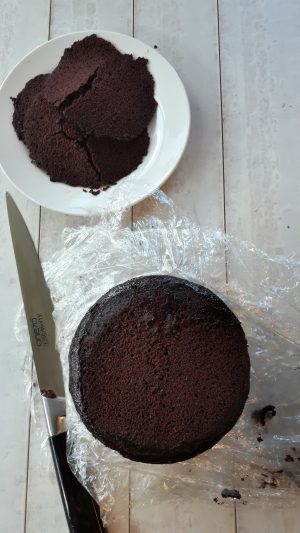
- When done transfer into a wire tray leave for 20 minutes until cooled and then remove from the pans carefully……leave to go cold . There is a dome and slight cracking, that doesn’t matter you will be trimming and you know you have a good risen bake
- Place in the fridge in clingfilm when cold for easier levelling……..its worth it !!!
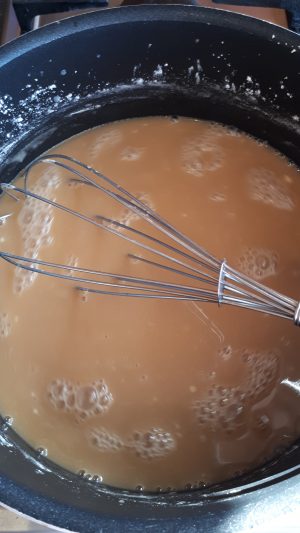
- Combine the flour, sugar, milk in a pan and whisk until combined
- On a low heat, dont rush it it will scorch, and whisking continually bring the pudding to a boil
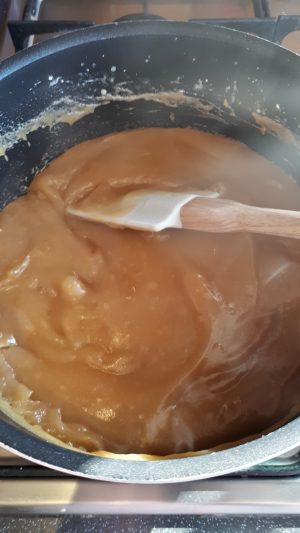
- Once boiling using a spatula continue to stir the pudding round the sides and the bottom using a folding motion.
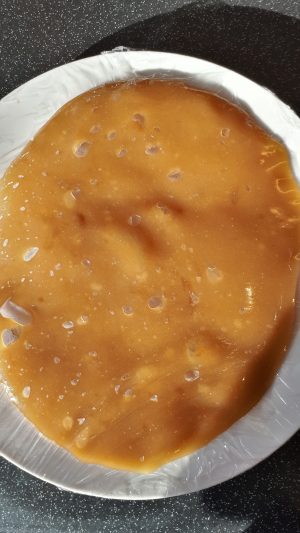
- Once the pudding starts to freely come away from the sides, about 2 minutes, transfer to a plate and cover clingfilm to prevent a skin and leave to cool at room temperature
- You can sieve onto a plate if you feel you have any lumps, but this needs to be done quickly ( and with all the frosting I’ve done I’ve only ever done this once because I took my eye off the ball….so it will be your fault if you HAVE TO 🙊)
- Whisk the fats in a mixer with a paddle attachment or with an electric hand mixer until fully combined and fluffy about 3 minutes
- Add the cooled pudding a tablespoon at a time making sure its combined before adding another ON HIGH
- Continue to mix until all the pudding is added
- Add the Vanilla for the last bit of mixing
- If for any reason you find your mix splitting, put the bowl in the fridge for 30 minutes then take it out and whisk on high speed for 5 minutes, this is usually caused by difference in ingredient temperatures
- If using all butter add a teaspoon of xanthan gum and whisk for at least 2 minutes until fully combined
- You can mush the frosting against the side of the bowl to remove some air or as i do pick up dollops with a spatula and flick it back into the bowl to remove the air……….. be careful it may ‘ fart’ back at you 😂😂😂😂
- Keep at room temperature
- If you need to refrigerate it may separate and little but just re whip
- Melt the golden syrup, vegan butter , sugar and vanilla essence in a small saucepan.
- Simmer for 5 minutes without stirring.
- Leave to cool slightly and then stir in the soya cream.
- Place in clean sealed jars will last two weeks in fridge but it wont you will eat it 🙈
- it can separate on cooling, but mixes back up with a spoon
- Boil Water and add to large pan with Chai Bags and sugar
- Peel the pears
- Bring to boil and then reduce to a simmer adding pears
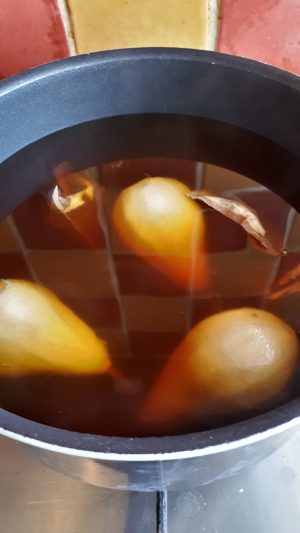
- Simmer for 15 to 20 minutes until pears are soft
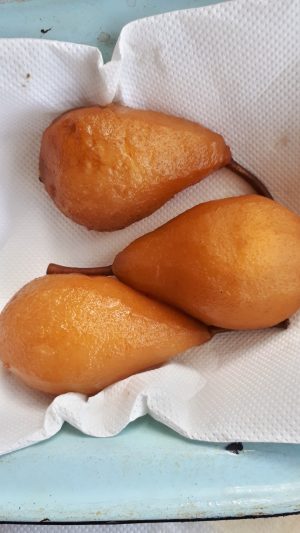
- Transfer onto kitchen paper and drain
- place into fridge to go cold
- Chop 2 of the pears into small pieces for filling
- level the cakes with a sharp large knife
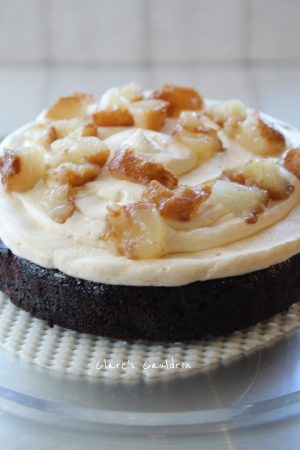
- Add a layer of frosting, i tend to do this with a disposable icing bag cut to a 1/2 inch diameter as it gives me even layers
- Pipe the frosting on in a circle and add a layer of pears, repeat finishing off with a layer of frosting on the top.
- Smooth or leave rustic…. that’s up to you
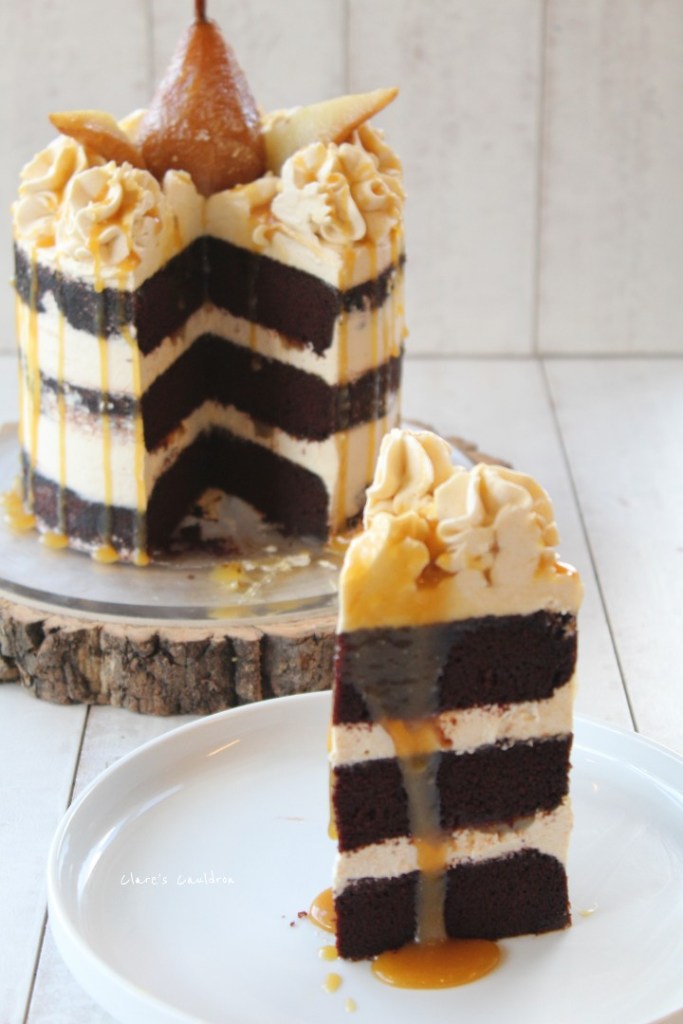
- Add a sliced pear
- Flick some caramel around , mine unintentionally ended up a ‘ drip cake esq ‘
- Round of Applause for me longest ever post…….sorry 🙈😜😂😂😂


MAKING THE ERMINE In depth method can be found here https://clarescauldron.com/2019/07/27/best-intolerance-frosting-ever-well-today-😂/#more-1501
MAKE THE CARAMEL / TOFFEE SAUCE
MAKE THE POACHED PEARS

TO ASSEMBLE

Well there you go…..phew that as a mammoth type up………but I can assure you you will not regret making this cake one little bit, its just divine.
Not only the cake ( hold on hold on I’m getting to the crumbporn….I promise )
But the marriage of the Cheats Caramel Ermine, The Chai Poached Pears ( Just for my dear friend and #pearpimp Kim😘) and the Toffee sauce is an absolute winner
I hasten to add I went a little over board with the sauce, it ended up a drip cake…….not my intention but well that pear needed covering as the photos where being taken……….so lets add some more moment 🙈
So here’s the moment you’ve been waiting for……..DRUMROLL please…………
I hope you are as excited as I …….just a little will do
READY !!!
STEADY !!!
THE CRUMBPORN and maybe a few other pics 😜😜😜

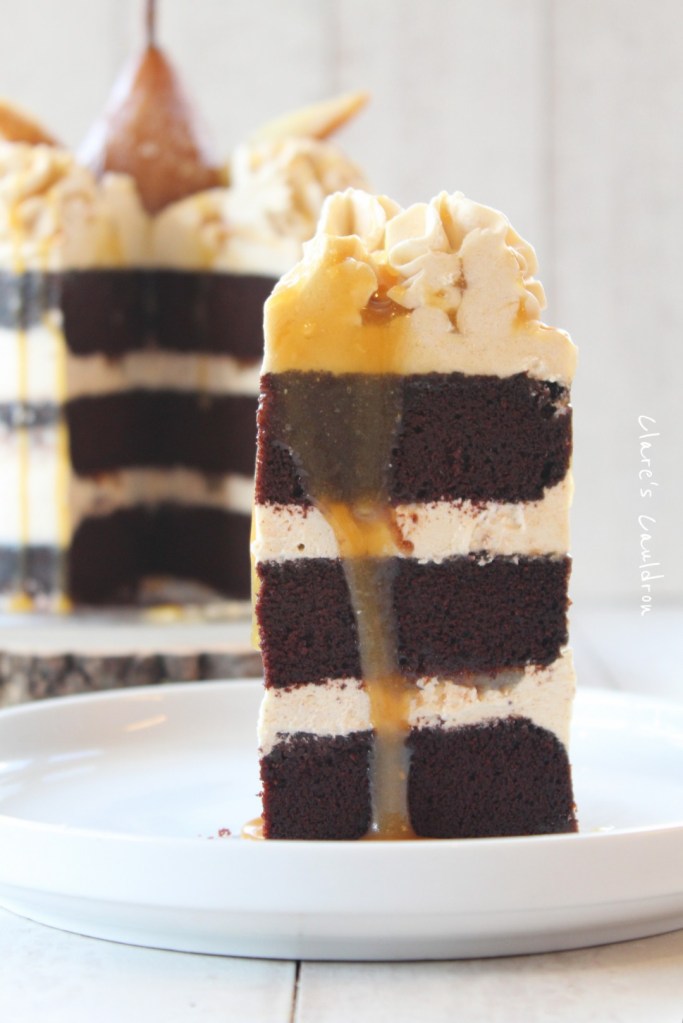
LOOK LOOK LOOK at that Crumbporn


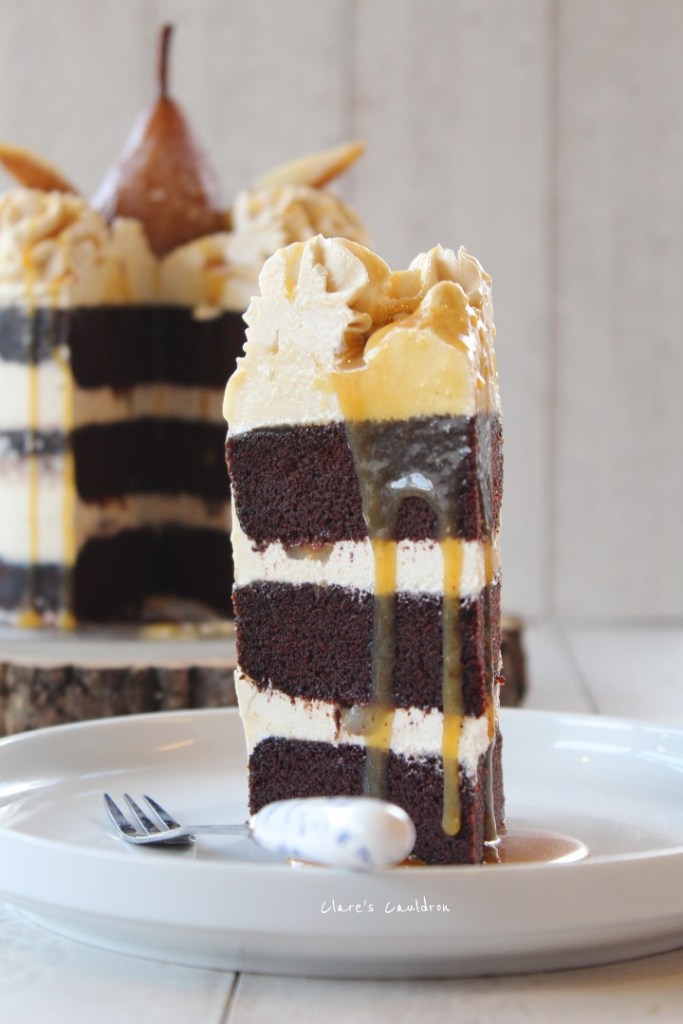
This ‘Layered ‘ Chocolate Cake Gluten Free and Vegan and standing proud 😍😍😍😍😍
I obviously need to thank Tessa for letting me do my thing, and adapt her recipe so #everyoneshouldenjoycake.
Thank You Tessa 😘💜
Please leave me a comment or a like, it does the world of good to keep me going and hopefully expand your knowledge.
Sign up for an email, so you never miss another recipe or some pretty picture, or follow on wordpress or Insta, see what I’m up too on a most daily basis.
If you make this cake or any of my recipes, let me know how you’ve gone on, drop me a line @clarescauldron tag me on insta or use my #everyoneshouldenjoycake.
Feel free to let your fingers do the talking and share this amongst your family, and awkward ones😂😂


Clare! This is stunning! I’m weak in the knees over this cake! 😍 Beautifully adapted, gorgeous in flavors (those pears!), bake and style. Lovely directions for a follow-along bake as well! ♥️
LikeLike
Thank you Kim. Thought you would appreciate ‘ A Good Pear ‘ 😂 it certainly came out well 💜💜
LikeLike
You’ve truly outdone yourself! This is absolute perfection. The cut shots is the cake… seriously drooling. Amazing job!!
LikeLike
Awe thank you Anna. I could but try. Hopefully it will inspire folk to know it not that difficult if you just relax and take your time 💜💜
LikeLike